
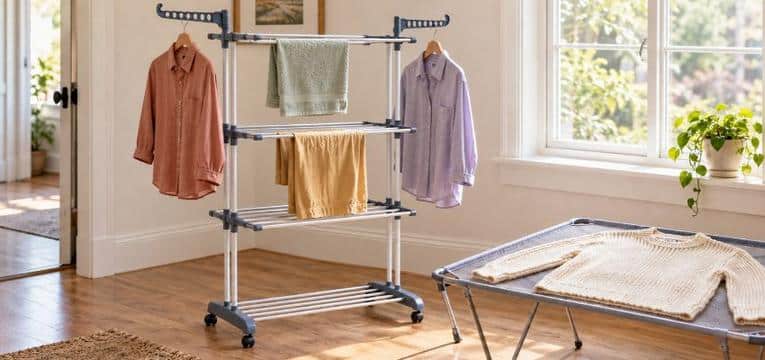
Air-drying needs suitable support, room between garments, and somewhere for moisture to go.
To air-dry clothes at home, you need a secure place to hang or lay them, enough space to keep wet fabric from bunching together, and conditions that allow moisture to leave the clothes. A drying rack or clothesline can provide the support. Hangers, clothespins, and a flat-drying surface depend on what is in the load.
You do not automatically need a fan, dehumidifier, or specialized rack. First check your available space and the care labels on your clothes. Those two things tell you more about the setup you need than the number of accessories in a laundry aisle.
A few shirts and a load of towels ask different things of the same room. Before choosing equipment, think about an ordinary load – including the awkward pieces you wash regularly, rather than only the easiest items to hang.
Start With Support, Space, and Airflow
- Support Use a stable rack, properly installed line, or suitable flat surface. It must support the wet load and hold each garment in a way its care label permits.
- Space Allow room for garments to hang or lie without being packed into thick layers. Count usable space around the fabric, not just the number of bars.
- Airflow Let air reach the damp fabric. Indoors, also consider how the released moisture will leave the room or be removed from the air.


Hangers are useful for garments that can dry while suspended, provided the hanger supports them appropriately. Clothespins help secure items on a line, especially outdoors. Neither is necessary for every piece: a towel may drape over a suitable rail, while a knit labeled “dry flat” needs support beneath it.
Existing equipment may cover a small load. However, a convenient-looking rail or hook is not necessarily designed to carry wet laundry. Check its intended use, installation, and load limit before relying on it. The drying location also needs to work while the clothes are hanging there.
Choose a Spot That Can Handle Moisture
-
Usable space
Check the area occupied by both the support and the hanging clothes. Doors, drawers, and walkways still need to work while the load dries.
Look forClearance around garments and access through the room.AvoidA rack that fits only when empty or partly folded. -
Moisture control
Indoor drying releases water into the room. Consider ventilation and existing humidity before choosing a permanent drying spot.
Look forA practical way to manage moisture during drying.AvoidIgnoring persistent condensation or existing damp patches. -
Secure placement
Use a stable floor location or suitable mounting points. Keep wet fabric away from electrical equipment and surfaces that could be damaged by water.
Look forFirm support and separation from vulnerable surfaces.AvoidUnrated fixtures, unstable placement, or blocked exits.
A room with spare floor space is not automatically a good drying room. A rack tucked behind furniture may have little air movement around it.
A bathroom may offer moisture-resistant surfaces and an exhaust fan, but it can also be crowded or humid after showers. Judge the actual conditions rather than choosing by room name.
A fan moves air around the clothes; it does not collect the water released into that air. Ventilation can exchange indoor and outdoor air when conditions are suitable, while a dehumidifier removes moisture from indoor air.
These are different functions. If the room regularly becomes humid during laundry drying, adding another rack alone will not address that problem.
The EPA’s moisture guidance recommends keeping indoor relative humidity below 60 percent, ideally between 30 and 50 percent where possible.
These are general home moisture-control recommendations, not a promise that laundry will dry within a particular time. Condensation on windows or walls is a reason to reassess the setup.
Outdoors, check the support, weather, and exposure of the location. Wind may require secure fastening, and rain may mean moving the load. A portable rack offers flexibility; a fixed line offers a consistent place to hang. Once you know where drying can happen, choosing the support becomes easier.
Match the Rack or Line to Your Home
The useful distinction is not simply “small rack” versus “large rack.” Consider whether the setup needs to move, whether installation is possible, and how the clothes will occupy the space. A compact product can still be awkward once sleeves, towels, and sheets hang beyond its frame.
Use a Folding Rack for Flexible Placement
-
Open footprint
Measure the rack fully opened, including wings or extensions. Allow additional room for garments hanging beyond the frame.
Look forA location where the loaded rack can remain without obstructing daily use.AvoidChoosing from folded dimensions alone. -
Usable hanging space
Check the spacing, height, and shape of the rails against your usual garments. Closely packed bars may not all be useful for bulky laundry at once.
Look forEnough separation and hanging height for a representative load.AvoidTreating advertised hanging length as guaranteed capacity for every fabric. -
Folded storage
Check where the rack will go between loads and how easy it is to carry there. Storage matters more when the equipment must be cleared away frequently.
Look forA reachable storage spot that fits the folded rack.AvoidA rack that stores neatly on paper but is awkward to retrieve.
For example, a tall rack may hold many small items while offering limited space for a wide sheet. A winged rack may handle longer garments but occupy much more floor area. Evaluate small-space drying racks by their loaded footprint and the laundry they can spread out, rather than their folded appearance.
Portability helps when the best drying location changes with the weather or household activities. If no suitable floor area is available, a door or wall can offer another arrangement – but the decision then includes mounting, clearance, and the load carried by the fixture.
Use Doors or Walls When Floor Space Is Tight
With over-door racks, check the door thickness, bracket fit, stated load limit, and clearance throughout the door’s movement. A rack that fits the top edge may still interfere with closing the door or press hanging fabric against a wall. Treat it as a load-specific option, not an automatic substitute for a full-size rack.
For frequent use, wall-mounted racks can provide a ready drying area without freestanding legs. They still occupy space when extended. Check the supporting wall, installation instructions, load rating, and any permission needed before making holes.


- It can free floor area that a freestanding frame would occupy.
- A dedicated location stays ready for regular laundry.
- Some designs fold or retract between uses.
- The mounting surface and fixings must suit the expected load.
- The drying location is harder to change after installation.
- Extended rails, lines, and hanging fabric still need clearance.
A retractable line needs a clear span and suitable attachment points. It may provide room to spread larger pieces, but its usable capacity depends on the model, installation, and load limits.
Choosing a line or rack becomes easier once you know whether your main constraint is floor space, installation, or the shape of the laundry.
That last point matters because not everything in a wash belongs on the same kind of support. Before counting how many pieces a setup can hold, separate the garments that need to lie flat from those that can hang.
Plan for Sweaters, Shirts, Towels, and Sheets
A rack that works for lightweight shirts may struggle with towel-heavy loads or leave no suitable place for a sweater. Plan around the pieces you wash repeatedly. Occasional awkward items may need a temporary arrangement; regular ones should influence the equipment choice.
Dry Knits Flat; Support Shirts Without Distortion
Start with the care label. If a garment needs flat drying, it needs support beneath its body rather than its wet weight hanging from the shoulders.
For wool knitwear, Woolmark’s drying guidance explains that hanging can stretch the garment and recommends flat drying, subject to the garment’s care instructions.
A clean, suitable towel can provide a flat surface for occasional use. If you regularly dry sweaters flat, plan enough horizontal space to support them without folding sleeves over the body or balancing them across narrow rails.
The detailed reshaping and drying method depends on the garment.
Air-dry does not always mean hang-dry. A garment may need to lie flat, hang from a line, or dry in shade. Follow its specific care instruction when choosing both the support and location.
Dedicated mesh drying racks provide a supported surface with openings underneath.
Their value depends on how often you need that surface, how large the garments are, and where the rack can be used and stored. They are an option for a recurring task, not a requirement for every household.
For shirts that can hang, the hanger should support the garment without concentrating its wet weight at narrow points. Hanger width, shoulder shape, and fabric weight can all affect shoulder bumps.
A hanger that stores a dry shirt adequately may not support the same shirt well when wet.
Keeping a garment’s shape is one challenge. Holding heavy towels and spreading large sheets introduce two others: load-bearing strength and usable fabric area.
Give Towels Strength and Sheets Room
- Wet weight needs suitable support Check the rack or line’s stated load limit, stability, and loading instructions. Wet towels require more than a convenient place to drape them.
- Large pieces need usable spread Sheets need room to hang without being compressed into many close layers. Rail width, hanging height, and space around the fabric matter alongside total hanging length.
Choose support for heavy wet towels using the manufacturer’s load guidance. A bending bar or unstable frame is a sign to reduce the load and reassess the equipment – not a reason to improvise extra weight onto nearby fixtures.
For sheets indoors, think about the space occupied by the fabric itself. Several short rails may be less useful than a suitable wider span. Before buying a larger rack, check whether it will actually allow a looser drape in the room available.
If bulky items are occasional, splitting laundry into separate drying sessions may be more practical than keeping a large rack year-round.
If most loads regularly exceed the space available, the overall capacity of the laundry appliance setup also matters: washing a large load is only convenient when you have a workable way to dry it.
Even a well-chosen support can produce a slow load when too much water remains in the fabric or the drying conditions are poor. Diagnose which limitation is present before adding another appliance.
Fix the Bottleneck Before Adding Equipment
-
Check how wet the load starts
Follow the garment and washer instructions when choosing a spin setting. For suitable hand-washed items, pressing water into a clean towel can reduce the amount left to evaporate. This removes some water; it does not finish drying the garment.
-
Check where fabric is hidden
Look for overlapping garments, crowded rails, and thick folds. A larger support helps only if the room allows you to use the extra area without packing the fabric together again.
-
Check the room’s conditions
Consider air movement and humidity separately. A fan may improve circulation; appropriate ventilation or a dehumidifier may help manage accumulated moisture. Choose equipment for the limitation you observe.
These checks help you dry clothes faster by addressing what is slowing the load. Adding hangers cannot fix a humid room, and buying a fan cannot make an overloaded frame suitable for heavy laundry.
A heated drying product is another equipment choice, with its own electrical requirements and operating instructions. Do not assume warmth alone removes moisture from the room.
If you consider one, evaluate both its garment compatibility and the room’s moisture-control arrangements.
There is no dependable countdown for every load. Fabric thickness, remaining water, spacing, temperature, and humidity affect the result. Before storing laundry, check seams, cuffs, waistbands, pockets, and other thick areas rather than judging by the driest part of the garment.
The most useful trial is a normal load in the place you intend to use. It reveals whether the missing piece is a different support, more room between garments, or better control of the drying conditions.
To air-dry clothes at home, start with secure support, room for the fabric, and a suitable place for moisture to leave. Add hangers, clips, or a flat-drying surface according to the garments you actually wash.
Try one representative load and name the limitation you find: not enough spread for sheets, inadequate support for towels, no place for flat drying, or a room that stays humid. Choose the next piece of equipment for that specific need. If the load dries properly and the space remains usable, your setup is already doing its job.
